


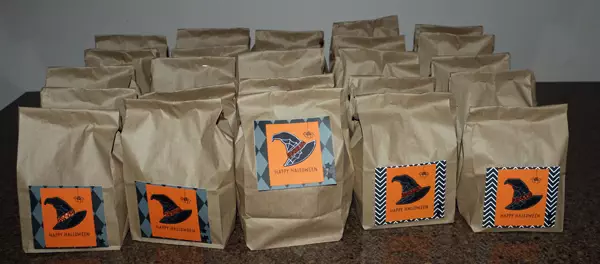
I have fond memories of the special treats that I received as a kid, so I wanted to pass on this tradition. I used the Bewitching Stamp Set and Witch Hat Builder Punch to make 25 of these cute Happy Halloween Treat Bags. Bring on the Trick Or Treaters.
SUPPLIES
Stamps:
Bewitching (cling 159855)*
* Purchase this stamp set and the coordinating Witch Hat Builder Punch as a BUNDLE (159857) and save 10%.
September Paper Pumpkin – Happy Halloween (photopolymer)
Inks:
VersaMark Pad (102283)
Tuxedo Black Memento Pad (132708)
Paper (including Cutting Dimensions):
Basic Black Cardstock {CS} (121045) 2-1/2” x 11”
Pumpkin Pie Cardstock {CS} (105117) 2-3/4” x 3-1/4”
Black & White Design 12” x 12” Designer Series Paper {DSP} (159861) Diamond & Wave Patterns 3-1/2” x 4”
Accessories:
Stamparatus Deluxe Foam Mat (150866) OR Stampin’ Pierce Mat (126199)
Clear Blocks B (117147), D (118485), and G (118489) OR save 10% with the Clear Block Bundle (118491)
Stampin’ Emboss Powders – Metallics (155555) – Silver
Embossing Additions Tool Kit (159971)
Heat Tool (129053)
Paper Snips (103579)
Witch Hat Builder Punch (159856)*
Glitter Washi Tape – Pumpkin Pie 2”
Stampin’ Seal (152813)
Stampin’ Dimensionals (104430)
Mini Glue Dots (103683)
Multipurpose Liquid Glue (110755)
Lunch Bags
Little Paint Brush
Stapler
INSTRUCTIONS
1. Wipe the Embossing Buddy over the Basic Black CS. Stamp Witch Hat (with the Spiders Web) using the VersaMark Ink on Basic Black CS. Hold the stamped Basic Black CS over the Powder Pal and pour the Silver Stampin’ Emboss Powder all over the wet VersaMark image. Tap off the excess. The Embossing Buddy helps to remove the static and the finger prints from the CS. If there are any stray pieces of powder left behind, use a little paint brush swept it away. Heat up the Heat Tool and heat the Embossing Powder until it is melted. Once it is done, blow on it to cool it, before you put CS in Witch Hat Builder Punch. I was able to get 4 Witch Hats out of every 2-1/2” x 11” strip, so the number of strips that you need will depend on how many Treat Bags you are making.
2. When you punch out the Witch Hat using the Witch Hat Builder Punch, make sure you punch the large Stars. Set them aside. You may have to trim the Basic Black CS using the Paper Snips, so you can line up the image with the punch.
3. The Pumpkin Pie Glitter Washi Tape tears really easy so adhere it to the Witch Hat and then just tear and fold the ends behind.
4. Ink up the Spider using Tuxedo Black Memento, stamp it onto the Pumpkin Pie CS in the upper right hand corner. When you stamp the Happy Halloween, make sure you put a Stamparatus Deluxe Foam Mat OR Stampin’ Pierce Mat under the Pumpkin Pie CS before you state the sentiments. This will give you a crisper image.
5. Cut the Black & White Design DSP. I could get 9 of these layers per sheet of DSP. Since I made 25 Treat Bags, I had to use a second pattern DSP to get the other 7 pieces.
6. Adhere 2 Stars to the lower right hand corner of the Black & White Design DSP. The best way to do it is, peel back the protective paper strip and place the Star directly onto the Mini Glue Dot, while it is still on the roll. When you remove the Star the Mini Glue Dot will be attached. Repeat for the second Star.
7. Assemble Treat Bag as follows:
• Adhere the Witch Hat to the Pumpkin Pie CS using Stampin’ Dimensionals
• Adhere Pumpkin Pie CS to the Black & White Design DSP using Stampin’ Seal;
• Adhere the Black & White Design DSP to the Treat Bag using Multipurpose Liquid Glue. Set aside to give it a chance for the glue to dry.
8. Place the treats in the Treat Bags. Fold the top down twice and staple them closed.
9. Happy Halloween!!!
Visit My Stampin’ Up! Store to purchase any of these products